RestDocs + Swagger UI로 API 문서화하기
이 포스트는 Spring RestDocs를 사용하여 프로젝트의 API 문서화를 진행하는 방법에 대해 설명합니다. 여러 API 문서화 도구 중에서도 Spring RestDocs는 그 자체의 강점을 가지고 있습니다. 하지만, 초기 설정이 복잡하고 UI가 미흡한 단점이 있습니다. 이러한 단점을 극복하고자 이 포스트에서는 RestDocs를 restdocs-api-spec과 함께 사용하여 Swagger-UI와 연동하는 방법에 대해 설명합니다.
RestDocs에 대하여
Spring RestDocs을 쓰게 된 이유
SpringDoc을 사용하면서 느낀 가장 큰 단점은 실제 코드에 다수의 애노테이션을 추가해야 한다는 것입니다. 이는 실제 코드를 복잡하게 만들고, 가독성을 떨어뜨립니다. 또한, API가 변경될 때마다 수동으로 문서를 업데이트해야 하며, 이 과정에서 실제 API와 문서 사이에 괴리가 발생할 수 있습니다.
RestDocs는 이러한 문제를 효과적으로 해결합니다. RestDocs는 API 문서를 생성하기 위해 테스트를 통과해야 하므로, API의 변경이 문서에 즉시 반영됩니다. 이로 인해 API와 문서 간의 불일치 문제를 최소화할 수 있습니다. 또한, 문서화 과정이 테스트 코드에 통합되어 있어 실제 코드를 오염시키지 않습니다.
왜 restdocs-api-spec과 Swagger UI가 필요한가?
RestDocs를 처음 써봤을 때, 단독으로 사용하기엔 초기 설정이 복잡하고 기본 UI가 너무 사용자 친화적이지 않다라는 느낌을 받았습니다. 그런데 너무 고맙게도 restdocs-api-spec과 swagger-ui를 이용해 우리 모두에게 친숙한 swagger 페이지로 만들 수 있다는걸 알게되었습니다.
restdocs-api-spec이란?
restdocs-api-spec은 Spring RestDocs를 사용하여 작성된 API 문서를 여러 가지 포맷(예: OpenAPI, Postman)으로 쉽게 변환할 수 있는 라이브러리입니다. 이 라이브러리를 사용함으로써, 개발자는 Spring RestDocs의 강력한 문서화 기능을 활용하면서, 다양한 API 문서 포맷과 도구를 손쉽게 사용할 수 있습니다.
주요 기능
다양한 포맷 지원:
restdocs-api-spec은 OpenAPI 3, AsyncAPI 2, Postman 컬렉션 등과 같은 주요 API 문서 포맷을 지원합니다. 이를 통해, 개발자는 프로젝트의 요구사항에 따라 적합한 포맷을 선택할 수 있습니다.통합 테스트와의 연동:
restdocs-api-spec은 Spring RestDocs와 밀접하게 통합되어 있어, API 문서화 작업을 더욱 원활하게 수행할 수 있습니다. 테스트 코드 내에서restdocs-api-spec을 사용하면, 문서 스니펫을 자동으로 생성하고, 선택한 포맷으로 쉽게 변환할 수 있습니다.Swagger UI와의 통합:
restdocs-api-spec을 이용하여 생성된 OpenAPI 문서는 Swagger UI와 쉽게 통합할 수 있습니다. 이를 통해, 개발자는 Swagger의 직관적인 UI를 활용하여 API 문서를 보다 효율적으로 관리하고 공유할 수 있습니다.
Gradle 설정하기
버전 설정
buildscript블록 내에서restdocsApiSpecVersion변수를 선언하여restdocs-api-spec라이브러리의 버전을 정의했습니다.1 2 3 4 5
buildscript { ext { restdocsApiSpecVersion = '0.18.4' } }
플러그인 적용
plugins블록에서restdocs-api-spec플러그인을 적용했습니다.1 2 3
plugins { id 'com.epages.restdocs-api-spec' version "${restdocsApiSpecVersion}" }
스니펫 디렉터리 설정
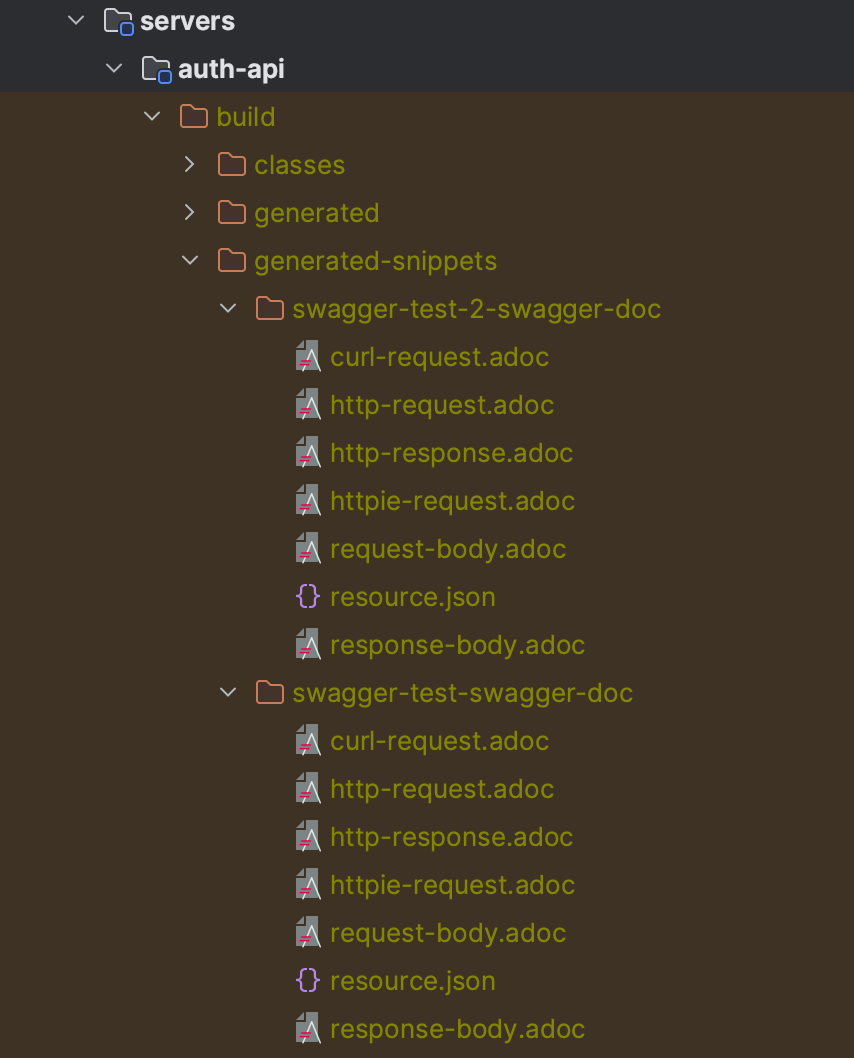
snippetsDir를build/generated-snippets로 설정했습니다. 이 디렉터리에는 Spring RestDocs에서 생성한 문서 스니펫이 저장됩니다.1 2 3
ext { set('snippetsDir', file("build/generated-snippets")) }
의존성 추가
testImplementation을 사용하여 테스트 범위 의존성을 추가했습니다.1 2 3 4
dependencies { testImplementation 'org.springframework.restdocs:spring-restdocs-mockmvc' testImplementation 'com.epages:restdocs-api-spec-mockmvc:' + restdocsApiSpecVersion }
테스트 태스크 설정
test태스크를 구성하여 출력 디렉터리를snippetsDir로 지정했습니다. 저의 경우엔 테스트 코드의 active profile 설정을 유연하게 하기 위해 환경 변수로 받아올 수 있게 설정했습니다. 또, 프로젝트가 오픈소스라서 데이터베이스 등의 민감한 정보를 숨기기 위해 jasypt로 암호화 했기 때문에 해당 암호키를 받아올 수 있게 설정을 추가해줬습니다.1 2 3 4 5 6 7
tasks.named('test') { outputs.dir snippetsDir useJUnitPlatform() systemProperty 'spring.profiles.active', System.getenv('SPRING_PROFILES_ACTIVE') systemProperty 'user.timezone', 'UTC' systemProperty 'jasypt.encryptor.password', System.getenv('JASYPT_ENCRYPTOR_PASSWORD') }
OpenAPI3 설정
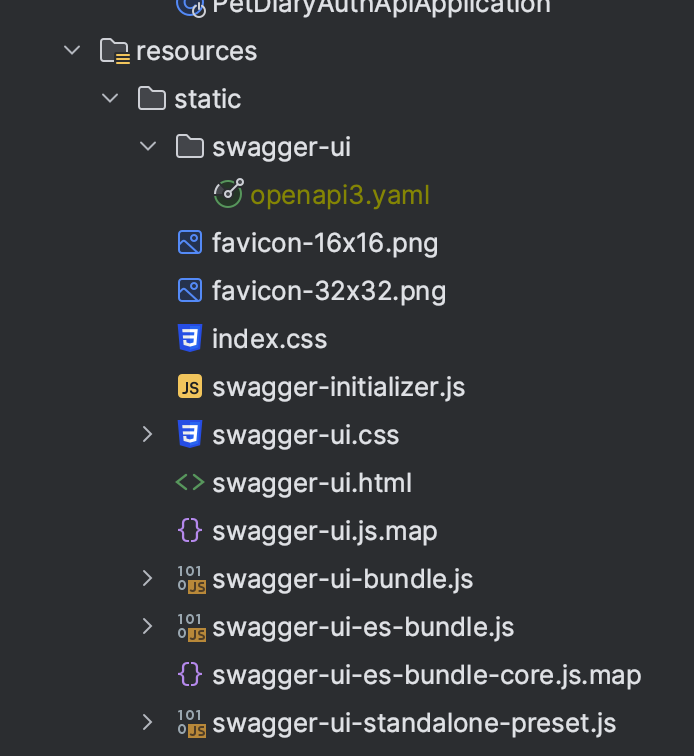
openapi3블록에서 OpenAPI 3 문서의 다양한 설정을 정의했습니다. 프로젝트의 active profile에 따라 openapi3의 server정보를 넣어줄 수 있도록 getOpenAPI3Server() 메서드를 정의했습니다. Swagger UI에 바로 적용할 수 있도록 format, outputDirectory, outputFileNamePrefix를 정의해줬습니다. 이렇게 설정할 경우src/main/resources/static/swagger-ui/openapi3.yaml파일이 생성됩니다.1 2 3 4 5 6 7 8 9 10 11 12 13 14 15 16 17 18 19 20 21
static def getOpenAPI3Server() { switch (System.getenv('SPRING_PROFILES_ACTIVE')) { case "prod": return "https://prod.example.com" case "dev": return "https://dev.example.com" default: return "http://localhost:8081" } } openapi3 { server = getOpenAPI3Server() title = 'PetDiary API Docs' description = 'PetDiary API 명세서입니다.<br/>' + 'AuthCtrl에서 로그인 API를 호출해서 받은 accessToken을 Authorize 버튼을 누른 뒤 넣어주시면 로그인 됩니다.' version = '0.0.1-SNAPSHOT' format = 'yaml' outputDirectory = 'src/main/resources/static/swagger-ui' outputFileNamePrefix = 'openapi3' }
Swagger 태스크 등록
swagger태스크를 등록하여 clean -> openapi3가 순차적으로 실행되어openapi3.yaml파일을 최신화하고securitySchemesContent설정을 넣어 bearer 헤더 토큰 인증이 가능하도록 만들어줍니다. 이제 swagger 태스크만 실행하면 작성한 테스트 코드를 기반으로 API 문서를 자동으로 생성합니다!1 2 3 4 5 6 7 8 9 10 11 12 13 14 15
tasks.register('swagger') { group = 'documentation' dependsOn 'clean', 'openapi3' doFirst { def openapi3File = file("src/main/resources/static/swagger-ui/openapi3.yaml") def securitySchemesContent = " securitySchemes:\n" + " bearerAuth:\n" + " type: http\n" + " scheme: bearer\n" + " bearerFormat: JWT\n" + "security:\n" + " - bearerAuth: []" openapi3File.append securitySchemesContent } }
공통 컨트롤러 테스트 코드 작성하기
본격적으로 컨트롤러 테스트 코드를 작성하기 전에, 공통으로 자주 쓰이는 부분을 추상화 클래스로 만들어주면 편리합니다.
1
2
3
4
5
6
7
8
9
10
11
12
13
14
15
16
17
18
19
20
21
22
23
24
25
26
27
28
29
30
31
32
33
34
35
36
37
38
39
40
41
42
43
44
45
46
47
48
49
50
51
52
53
54
55
56
57
58
59
60
61
62
63
64
65
66
67
68
69
70
71
72
73
74
75
76
77
78
79
80
81
82
83
84
85
86
87
88
89
90
91
92
93
94
95
96
97
98
99
100
101
102
103
104
105
106
107
108
109
110
111
112
113
114
115
116
117
118
package com.petdiary.ctrl.config;

import com.fasterxml.jackson.core.JsonProcessingException;
import com.fasterxml.jackson.databind.ObjectMapper;
import com.petdiary.domain.rdspetdiarymembershipdb.enums.MemberStatusType;
import com.petdiary.security.ApiUserPrincipal;
import org.junit.jupiter.api.BeforeEach;
import org.junit.jupiter.api.extension.ExtendWith;
import org.springframework.beans.factory.annotation.Autowired;
import org.springframework.boot.test.autoconfigure.restdocs.AutoConfigureRestDocs;
import org.springframework.boot.test.autoconfigure.web.servlet.AutoConfigureMockMvc;
import org.springframework.restdocs.RestDocumentationContextProvider;
import org.springframework.restdocs.RestDocumentationExtension;
import org.springframework.restdocs.payload.FieldDescriptor;
import org.springframework.security.authentication.UsernamePasswordAuthenticationToken;
import org.springframework.security.core.Authentication;
import org.springframework.security.core.authority.SimpleGrantedAuthority;
import org.springframework.security.core.context.SecurityContextHolder;
import org.springframework.test.web.servlet.MockMvc;
import org.springframework.test.web.servlet.setup.MockMvcBuilders;
import org.springframework.web.context.WebApplicationContext;
import org.springframework.web.filter.CharacterEncodingFilter;

import java.util.Arrays;
import java.util.Collections;
import java.util.List;
import java.util.stream.Collectors;
import java.util.stream.Stream;

import static org.springframework.restdocs.mockmvc.MockMvcRestDocumentation.documentationConfiguration;
import static org.springframework.restdocs.payload.PayloadDocumentation.fieldWithPath;
import static org.springframework.test.web.servlet.result.MockMvcResultHandlers.print;

@AutoConfigureMockMvc
@AutoConfigureRestDocs
@ExtendWith({RestDocumentationExtension.class})
public abstract class CtrlTestConfig {
    @Autowired
    protected WebApplicationContext ctx;

    @Autowired
    protected ObjectMapper objectMapper;

    protected MockMvc mockMvc;

    @BeforeEach
    void setUp(final RestDocumentationContextProvider restDocumentation) {
        mockMvc = MockMvcBuilders.webAppContextSetup(ctx)
                .apply(documentationConfiguration(restDocumentation))
                .addFilters(new CharacterEncodingFilter("UTF-8", true))
                .alwaysDo(print())
                .build();

        // Mock Principal
        ApiUserPrincipal principal = ApiUserPrincipal.builder()
                .idx(TestConstants.TEST_USER_IDX)
                .email(TestConstants.TEST_USER_EMAIL)
                .password(TestConstants.TEST_USER_PASSWORD)
                .name(TestConstants.TEST_USER_NAME)
                .authorities(Collections.singleton(new SimpleGrantedAuthority("USER")))
                .status(MemberStatusType.VERIFIED)
                .build();
        Authentication auth = new UsernamePasswordAuthenticationToken(principal, null, principal.getAuthorities());
        SecurityContextHolder.getContext().setAuthentication(auth);
    }

    protected String getJsonContent(Object object) throws JsonProcessingException {
        return objectMapper.writeValueAsString(object);
    }

    protected List<FieldDescriptor> commonRes() {
        return Arrays.asList(
                fieldWithPath("result.httpStatusCode").description("HTTP 상태 코드"),
                fieldWithPath("result.code").description("응답 코드"),
                fieldWithPath("result.message").description("응답 메시지"),
                fieldWithPath("body").description("응답 상세").optional()
        );
    }

    protected List<FieldDescriptor> commonResBodyFields(FieldDescriptor... fieldDescriptors) {
        List<FieldDescriptor> commonFields = Arrays.asList(
                fieldWithPath("result.httpStatusCode").description("HTTP 상태 코드"),
                fieldWithPath("result.code").description("응답 코드"),
                fieldWithPath("result.message").description("응답 메시지")
        );

        return Stream.concat(commonFields.stream(), Stream.of(fieldDescriptors))
                .collect(Collectors.toList());
    }

    /**
     * 클래스명과 메서드명을 참고해 자동으로 문서명을 작성해주는 유틸 함수
     */
    protected String getDocumentName() {
        // 현재 실행 중인 메서드와 클래스의 정보를 가져옴
        StackTraceElement currentElement = Thread.currentThread().getStackTrace()[2];
        String className = currentElement.getClassName();
        String methodName = currentElement.getMethodName();

        // "CtrlTests", "CtrlTest", "Tests", "Test" 접미사 제거
        className = className.substring(className.lastIndexOf('.') + 1).replaceAll("(CtrlTests?|Tests?)$", "");

        // "test" 접두사 제거
        methodName = methodName.replaceFirst("^test", "");

        // CamelCase를 hyphen-case로 변환
        String hyphenClassName = camelToHyphen(className);
        String hyphenMethodName = camelToHyphen(methodName);

        return hyphenClassName + "-" + hyphenMethodName + "-doc";
    }

    private static String camelToHyphen(String str) {
        return str
                .replaceAll("(.)(\\p{Upper})", "$1-$2")
                .toLowerCase();
    }
}
클래스 선언 및 어노테이션
@AutoConfigureMockMvc와@AutoConfigureRestDocs어노테이션은 MockMvc 및 REST Docs를 자동 구성합니다.@ExtendWith({RestDocumentationExtension.class})는 JUnit 5 테스트에 REST 문서 확장을 적용합니다.
멤버 변수
WebApplicationContext,ObjectMapper, 그리고MockMvc는 Spring 컨텍스트, JSON 변환, 그리고 MockMvc 테스트를 위해 Autowired됩니다.
setUp 메서드
setUp메서드에서는mockMvc인스턴스를 초기화하며, 이는 테스트 시에 웹 애플리케이션의 컨텍스트 설정과 함께 사용됩니다.CharacterEncodingFilter도 추가되어 문자 인코딩이 UTF-8로 설정됩니다.- 추가적으로, 테스트 사용자의
ApiUserPrincipal객체를 생성하고 이를 사용하여SecurityContext에 인증 객체를 설정하여 보안 컨텍스트를 모의 설정합니다.
getJsonContent 메서드
getJsonContent메서드는 주어진 객체를 JSON 문자열로 변환합니다. 이는ObjectMapper를 사용하여 수행됩니다.
commonRes 및 commonResBodyFields 메서드
commonRes메서드는 공통 응답 필드의 목록을 반환합니다.commonResBodyFields메서드는commonRes의 결과와 추가적인 필드 목록을 결합하여 반환합니다.
getDocumentName 메서드
getDocumentName메서드는 현재 실행 중인 테스트 메서드의 이름을 기반으로 문서 이름을 자동으로 생성합니다. 이 이름은 hyphen-case로 변환되며, 클래스와 메서드 이름에서 특정 접두사/접미사가 제거됩니다.
이 구조를 사용하면 테스트 코드를 작성할 때 많은 보일러플레이트 코드를 생략할 수 있으며, 테스트 시에 일관된 설정을 적용할 수 있습니다.
API 작성하기
컨트롤러: SwaggerTestCtrl
이 클래스는 두 개의 GET 엔드포인트를 제공합니다:
GET /api/v1/swagger-test:- 요청 객체
SwaggerTestReq.Test1Dto를 받아swaggerTestSvc.test1(reqDto)를 호출하고 그 결과를 반환합니다. - 반환 타입:
ComResponseEntity<SwaggerTestRes.Test1Dto>
- 요청 객체
GET /api/v1/swagger-test/member:swaggerTestSvc.getMemberList()를 호출하여 회원 목록을 반환합니다.- 반환 타입:
ComResponseEntity<List<MemberDomain.Dto>>
1
2
3
4
5
6
7
8
9
10
11
12
13
14
15
16
17
18
19
20
21
22
23
24
25
26
27
28
29
30
31
32
33
package com.petdiary.controller;

import com.petdiary.core.dto.ComResponseDto;
import com.petdiary.core.dto.ComResponseEntity;
import com.petdiary.domain.rdspetdiarymembershipdb.dto.MemberDomain;
import com.petdiary.dto.req.SwaggerTestReq;
import com.petdiary.dto.res.SwaggerTestRes;
import com.petdiary.service.SwaggerTestSvc;
import lombok.RequiredArgsConstructor;
import lombok.extern.slf4j.Slf4j;
import org.springframework.web.bind.annotation.GetMapping;
import org.springframework.web.bind.annotation.RequestMapping;
import org.springframework.web.bind.annotation.RestController;

import java.util.List;

@RestController
@RequestMapping("/api/v1/swagger-test")
@RequiredArgsConstructor
@Slf4j
public class SwaggerTestCtrl {
    private final SwaggerTestSvc swaggerTestSvc;

    @GetMapping
    public ComResponseEntity<SwaggerTestRes.Test1Dto> test1(SwaggerTestReq.Test1Dto reqDto) {
        return new ComResponseEntity<>(new ComResponseDto<>(swaggerTestSvc.test1(reqDto)));
    }

    @GetMapping("/member")
    public ComResponseEntity<List<MemberDomain.Dto>> test2() {
        return new ComResponseEntity<>(new ComResponseDto<>(swaggerTestSvc.getMemberList()));
    }
}
서비스 레이어: SwaggerTestSvc
이 클래스는 두 개의 메서드를 제공합니다:
test1(SwaggerTestReq.Test1Dto reqDto):- 주어진 요청 DTO를 받아 이를 그대로 반환합니다. 요청 DTO에는 바이트, 문자열, 롱, 및
Test2Dto리스트가 포함됩니다.
- 주어진 요청 DTO를 받아 이를 그대로 반환합니다. 요청 DTO에는 바이트, 문자열, 롱, 및
getMemberList():memberDomainSvc.getList()를 호출하여 회원 목록을 반환합니다.
1
2
3
4
5
6
7
8
9
10
11
12
13
14
15
16
17
18
19
20
21
22
23
24
25
26
27
28
29
30
31
32
33
34
35
36
37
38
39
40
package com.petdiary.service;

import com.petdiary.domain.rdspetdiarymembershipdb.dto.MemberDomain;
import com.petdiary.domain.rdspetdiarymembershipdb.service.MemberDomainSvc;
import com.petdiary.dto.req.SwaggerTestReq;
import com.petdiary.dto.res.SwaggerTestRes;
import lombok.RequiredArgsConstructor;
import org.springframework.stereotype.Service;

import java.util.ArrayList;
import java.util.List;

@Service
@RequiredArgsConstructor
public class SwaggerTestSvc {
    private final MemberDomainSvc memberDomainSvc;

    /**
     * 테스트용 서비스니까 그냥 받은 요청값이랑 똑같게 반환하도록 함
     */
    public SwaggerTestRes.Test1Dto test1(SwaggerTestReq.Test1Dto reqDto) {
        SwaggerTestRes.Test1Dto res = SwaggerTestRes.Test1Dto.builder()
                .byteTest(reqDto.getByteTest1())
                .stringTest(reqDto.getStringTest2())
                .longTest(reqDto.getLongTest3())
                .test2DtoList(new ArrayList<>())
                .build();
        for (SwaggerTestReq.Test2Dto test2Dto :reqDto.getTest2DtoList()) {
            res.getTest2DtoList().add(SwaggerTestRes.Test2Dto.builder()
                            .subLongTest(test2Dto.getSubLongTest())
                            .subStringTest(test2Dto.getSubStringTest())
                    .build());
        }
        return res;
    }

    public List<MemberDomain.Dto> getMemberList() {
        return memberDomainSvc.getList();
    }
}
요청 DTO: SwaggerTestReq
이 클래스는 두 개의 정적 내부 클래스를 포함합니다:
Test1Dto:- 바이트 (
byteTest1), 문자열 (stringTest2), 롱 (longTest3), 및Test2Dto리스트 (test2DtoList)를 포함합니다.
- 바이트 (
Test2Dto:- 롱 (
subLongTest) 및 문자열 (subStringTest)를 포함합니다.
- 롱 (
1
2
3
4
5
6
7
8
9
10
11
12
13
14
15
16
17
18
19
20
21
22
package com.petdiary.dto.req;

import lombok.Getter;
import lombok.Setter;

import java.util.List;

public class SwaggerTestReq {
    @Getter @Setter
    public static class Test1Dto {
        private Byte byteTest1;
        private String stringTest2;
        private Long longTest3;
        private List<Test2Dto> test2DtoList;
    }

    @Getter @Setter
    public static class Test2Dto {
        private Long subLongTest;
        private String subStringTest;
    }
}
응답 DTO: SwaggerTestRes
이 클래스도 두 개의 정적 내부 클래스를 포함합니다:
Test1Dto:- 바이트 (
byteTest), 문자열 (stringTest), 롱 (longTest), 및Test2Dto리스트 (test2DtoList)를 포함합니다.
- 바이트 (
Test2Dto:- 롱 (
subLongTest) 및 문자열 (subStringTest)를 포함합니다.
- 롱 (
1
2
3
4
5
6
7
8
9
10
11
12
13
14
15
16
17
18
19
20
21
22
package com.petdiary.dto.res;

import lombok.Builder;
import lombok.Getter;

import java.util.List;

public class SwaggerTestRes {
    @Getter @Builder
    public static class Test1Dto {
        private Byte byteTest;
        private String stringTest;
        private Long longTest;
        private List<Test2Dto> test2DtoList;
    }

    @Getter @Builder
    public static class Test2Dto {
        private Long subLongTest;
        private String subStringTest;
    }
}
위의 클래스들과 메서드들은 Swagger 테스트를 위해 작성되었으며, 실제 작동 로직은 매우 간단합니다. 주로 요청을 받아 그대로 반환하거나, 회원 목록을 가져와 반환하는 기능을 수행합니다.
컨트롤러 테스트 코드 작성
이제 SwaggerTestCtrl 컨트롤러의 두 엔드포인트를 테스트하는 코드를 작성해보겠습니다.
1
2
3
4
5
6
7
8
9
10
11
12
13
14
15
16
17
18
19
20
21
22
23
24
25
26
27
28
29
30
31
32
33
34
35
36
37
38
39
40
41
42
43
44
45
46
47
48
49
50
51
52
53
54
55
56
57
58
59
60
61
62
63
64
65
66
67
68
69
70
71
72
73
74
75
76
77
78
79
80
81
82
83
84
85
86
87
88
89
90
91
92
93
94
95
96
97
98
99
100
101
102
103
104
105
106
107
108
109
110
111
112
113
114
package com.petdiary.ctrl;

import com.epages.restdocs.apispec.ResourceDocumentation;
import com.epages.restdocs.apispec.ResourceSnippetParameters;
import com.epages.restdocs.apispec.SimpleType;
import com.petdiary.controller.SwaggerTestCtrl;
import com.petdiary.core.exception.ResponseCode;
import com.petdiary.ctrl.config.CtrlTestConfig;
import com.petdiary.ctrl.factory.SwaggerTestDtoFactory;
import com.petdiary.domain.rdspetdiarymembershipdb.dto.MemberDomain;
import com.petdiary.dto.req.SwaggerTestReq;
import com.petdiary.dto.res.SwaggerTestRes;
import com.petdiary.service.SwaggerTestSvc;
import org.junit.jupiter.api.Test;
import org.springframework.boot.test.autoconfigure.web.servlet.WebMvcTest;
import org.springframework.boot.test.mock.mockito.MockBean;

import java.util.List;

import static com.epages.restdocs.apispec.ResourceDocumentation.parameterWithName;
import static org.mockito.Mockito.any;
import static org.mockito.Mockito.when;
import static org.springframework.restdocs.mockmvc.MockMvcRestDocumentation.document;
import static org.springframework.restdocs.mockmvc.RestDocumentationRequestBuilders.get;
import static org.springframework.restdocs.payload.PayloadDocumentation.fieldWithPath;
import static org.springframework.test.web.servlet.result.MockMvcResultMatchers.jsonPath;
import static org.springframework.test.web.servlet.result.MockMvcResultMatchers.status;


@WebMvcTest(SwaggerTestCtrl.class)
public class SwaggerTestCtrlTests extends CtrlTestConfig {
    @MockBean
    private SwaggerTestSvc swaggerTestSvc;

    @Test
    public void testSwagger() throws Exception {
        SwaggerTestReq.Test1Dto reqDto = SwaggerTestDtoFactory.createTest1ReqDto();

        SwaggerTestRes.Test1Dto mockResDto = SwaggerTestDtoFactory.createTest1ResDto();

        when(swaggerTestSvc.test1(any())).thenReturn(mockResDto);

        mockMvc.perform(get("/api/v1/swagger-test")
                        .queryParam("byteTest1", reqDto.getByteTest1().toString())
                        .queryParam("stringTest2", reqDto.getStringTest2())
                        .queryParam("longTest3", reqDto.getLongTest3().toString())
                        .queryParam("test2DtoList[0].subLongTest", reqDto.getTest2DtoList().get(0).getSubLongTest().toString())
                        .queryParam("test2DtoList[0].subStringTest", reqDto.getTest2DtoList().get(0).getSubStringTest()))
                .andExpect(status().is2xxSuccessful())
                .andExpect(jsonPath("$.result.httpStatusCode").value(ResponseCode.SUCCESS.getHttpStatusCode())) // httpStatusCode 값 검증
                .andExpect(jsonPath("$.result.code").value(ResponseCode.SUCCESS.getCode())) // code 값 검증
                .andDo(document(getDocumentName(),
                        ResourceDocumentation.resource(
                            ResourceSnippetParameters.builder()
                                    .tag("SwaggerTestCtrl")
                                    .description("Swagger 테스트용 API")
                                    .queryParameters(
                                            parameterWithName("byteTest1")
                                                    .type(SimpleType.NUMBER)
                                                    .defaultValue(reqDto.getByteTest1())
                                                    .description("byte 테스트"),
                                            parameterWithName("stringTest2")
                                                    .defaultValue(reqDto.getStringTest2())
                                                    .description("string 테스트"),
                                            parameterWithName("longTest3")
                                                    .type(SimpleType.NUMBER)
                                                    .defaultValue(reqDto.getLongTest3())
                                                    .description("long 테스트"),
                                            parameterWithName("test2DtoList[0].subLongTest")
                                                    .type(SimpleType.NUMBER)
                                                    .defaultValue(reqDto.getTest2DtoList().get(0).getSubLongTest())
                                                    .optional()
                                                    .description("리스트 객체 long 테스트"),
                                            parameterWithName("test2DtoList[0].subStringTest")
                                                    .defaultValue(reqDto.getTest2DtoList().get(0).getSubStringTest())
                                                    .optional()
                                                    .description("리스트 객체 string 테스트")
                                    )
                                    .responseFields(
                                            commonResBodyFields(
                                                    fieldWithPath("body.byteTest").description("바이트 타입 테스트"),
                                                    fieldWithPath("body.stringTest").description("스트링 타입 테스트"),
                                                    fieldWithPath("body.longTest").description("숫자 타입 테스트"),
                                                    fieldWithPath("body.test2DtoList").description("객체 리스트 타입 테스트"),
                                                    fieldWithPath("body.test2DtoList[0].subLongTest").description("리스트 내 객체의 숫자 타입 테스트"),
                                                    fieldWithPath("body.test2DtoList[0].subStringTest").description("리스트 내 객체의 문자열 타입 테스트")
                                            )
                                    )
                                    .build()
                )))
        ;
    }

    @Test
    public void test2Swagger() throws Exception {
        List<MemberDomain.Dto> mockResDto = SwaggerTestDtoFactory.createTest2ResDto();

        when(swaggerTestSvc.getMemberList()).thenReturn(mockResDto);

        mockMvc.perform(get("/api/v1/swagger-test/member"))
                .andExpect(status().is2xxSuccessful())
                .andExpect(jsonPath("$.result.httpStatusCode").value(ResponseCode.SUCCESS.getHttpStatusCode())) // httpStatusCode 값 검증
                .andExpect(jsonPath("$.result.code").value(ResponseCode.SUCCESS.getCode())) // code 값 검증
                .andDo(document(getDocumentName(),
                        ResourceDocumentation.resource(
                                ResourceSnippetParameters.builder()
                                        .tag("SwaggerTestCtrl")
                                        .description("Swagger 테스트용 API")
                                        .build()
                        )))
        ;
    }
}
testSwagger() 메서드
목 객체 설정
SwaggerTestReq.Test1Dto reqDto는 테스트 요청 객체를 생성합니다.SwaggerTestRes.Test1Dto mockResDto는 목 객체를 생성합니다.swaggerTestSvc.test1(any())가 호출되면mockResDto를 반환하도록 설정됩니다.
DtoFactory 코드는 아래와 같습니다.
1
2
3
4
5
6
7
8
9
10
11
12
13
14
15
16
17
18
19
20
21
22
23
24
25
26
27
28
29
30
31
32
33
34
35
36
37
38
39
40
41
42
43
44
45
46
47
48
49
50
51
52
53
54
55
56
57
58
59
60
61
62
63
64
65
66
67
68
69
70
package com.petdiary.ctrl.factory;

 import com.petdiary.domain.rdspetdiarymembershipdb.dto.MemberDomain;
 import com.petdiary.dto.req.SwaggerTestReq;
 import com.petdiary.dto.res.SwaggerTestRes;

 import java.util.ArrayList;
 import java.util.List;

 public class SwaggerTestDtoFactory {
     private static final byte BYTE_TEST_1 = 1;
     private static final String STRING_TEST_2 = "test";
     private static final long LONG_TEST_3 = 100000;
     private static final long SUB_LONG_TEST = 2560000;
     private static final String SUB_STRING_TEST = "subTest";

     public static SwaggerTestReq.Test1Dto createTest1ReqDto() {
         SwaggerTestReq.Test1Dto reqDto = new SwaggerTestReq.Test1Dto();
         reqDto.setByteTest1(BYTE_TEST_1);
         reqDto.setStringTest2(STRING_TEST_2);
         reqDto.setLongTest3(LONG_TEST_3);
         reqDto.setTest2DtoList(new ArrayList<>());

         SwaggerTestReq.Test2Dto subReqDto = new SwaggerTestReq.Test2Dto();
         subReqDto.setSubLongTest(SUB_LONG_TEST);
         subReqDto.setSubStringTest(SUB_STRING_TEST);
         reqDto.getTest2DtoList().add(subReqDto);

         return reqDto;
     }

     public static SwaggerTestRes.Test1Dto createTest1ResDto() {
         List<SwaggerTestRes.Test2Dto> test2DtoList = new ArrayList<>();
         for (int i = 1; i < 6; i++) {
             test2DtoList.add(SwaggerTestRes.Test2Dto.builder()
                     .subStringTest(SUB_STRING_TEST + "_" + i)
                     .subLongTest(SUB_LONG_TEST + i)
                     .build());
         }
         return SwaggerTestRes.Test1Dto.builder()
                 .byteTest(BYTE_TEST_1)
                 .stringTest(STRING_TEST_2)
                 .longTest(LONG_TEST_3)
                 .test2DtoList(test2DtoList)
                 .build();
     }

     public static List<MemberDomain.Dto> createTest2ResDto() {
         List<MemberDomain.Dto> result = new ArrayList<>();
         result.add(MemberDomain.Dto.builder()
                 .idx(1L)
                 .email("test@example.com")
                 .name("테스트")
                 .build());

         result.add(MemberDomain.Dto.builder()
                 .idx(2L)
                 .email("asdf1234@example.com")
                 .name("김아무개")
                 .build());

         result.add(MemberDomain.Dto.builder()
                 .idx(3L)
                 .email("214214215@qq.com")
                 .name("김영희")
                 .build());

         return result;
     }
 }
MVC 테스트 수행
GET /api/v1/swagger-test엔드포인트에 대한 요청을 수행합니다.- 요청 쿼리 파라미터는
reqDto에서 설정됩니다. - 응답 상태 코드는 2xx (성공)를 예상합니다.
- 응답 본문의
httpStatusCode와code필드는ResponseCode.SUCCESS의 상태 코드 및 코드와 일치해야 합니다.
문서화
- 이 요청과 응답은 문서화되며, 각 쿼리 파라미터와 응답 본문 필드에 대한 설명이 포함됩니다.
test2Swagger() 메서드
목 객체 설정
List<MemberDomain.Dto> mockResDto는 목 객체를 생성합니다.swaggerTestSvc.getMemberList()가 호출되면mockResDto를 반환하도록 설정됩니다.
MVC 테스트 수행
GET /api/v1/swagger-test/member엔드포인트에 대한 요청을 수행합니다.- 응답 상태 코드는 2xx (성공)를 예상합니다.
- 응답 본문의
httpStatusCode와code필드는ResponseCode.SUCCESS의 상태 코드 및 코드와 일치해야 합니다.
문서화
- 이 요청과 응답은 문서화되며, 엔드포인트에 대한 간단한 설명이 포함됩니다.
위의 두 메서드 모두, 테스트 수행 후에는 문서화를 위한 코드가 포함되어 있어, 이 테스트를 실행하면 위 그림처럼 API 문서도 자동으로 생성됩니다. RestDocumentationRequestBuilders, PayloadDocumentation, 및 ResourceDocumentation 클래스를 사용하여 요청과 응답, 그리고 API 리소스를 문서화합니다.
Swagger UI 적용하기
BackEnd
Swagger UI를 적용하기 위해 WebMvcConfigurer에서 ResourceHandler를 설정해줍니다.
1
2
3
4
5
6
7
8
9
10
11
12
13
14
15
16
package com.petdiary.config;

import org.springframework.context.annotation.Configuration;
import org.springframework.web.servlet.config.annotation.ResourceHandlerRegistry;
import org.springframework.web.servlet.config.annotation.WebMvcConfigurer;

@Configuration
public class WebMvcConfig implements WebMvcConfigurer {
    @Override
    public void addResourceHandlers(ResourceHandlerRegistry registry) {
        registry.addResourceHandler("swagger-ui.html").addResourceLocations("classpath:/static/swagger-ui.html");
        registry.addResourceHandler("/static/**").addResourceLocations("classpath:/static/");
        WebMvcConfigurer.super.addResourceHandlers(registry);
    }
}
FrontEnd
ResourceHandler를 설정했다면 이제 Swagger UI를 적용하는 방법은 간단합니다. 위에서 Gradle에서 작성한 swagger 태스크를 실행하면 openapi3.yaml을 생성해주기 때문에 우리가 할 일은 그저 swagger-ui static file들을 매핑시켜주는 일뿐입니다.
단, swagger-ui.html과 swagger-initializer.js는 프로젝트에 맞게 수정해주셔야합니다!
1
2
3
4
5
6
7
8
9
10
11
12
13
14
15
16
17
18
19
20
21
22
23
24
25
26
27
28
29
30
31
32
<!-- HTML for static distribution bundle build -->
<!DOCTYPE html>
<html lang="en">
  <head>
    <meta charset="UTF-8" />
    <title>Pet Diary API Docs Swagger</title>
    <link rel="stylesheet" type="text/css" href="/static/swagger-ui.css" />
    <link rel="stylesheet" type="text/css" href="/static/index.css" />
    <link
      rel="icon"
      type="image/png"
      href="/static/favicon-32x32.png"
      sizes="32x32"
    />
    <link
      rel="icon"
      type="image/png"
      href="/static/favicon-16x16.png"
      sizes="16x16"
    />
  </head>

  <body>
    <div id="swagger-ui"></div>
    <script src="/static/swagger-ui-bundle.js" charset="UTF-8"></script>
    <script
      src="/static/swagger-ui-standalone-preset.js"
      charset="UTF-8"
    ></script>
    <script src="/static/swagger-initializer.js" charset="UTF-8"></script>
  </body>
</html>
1
2
3
4
5
6
7
8
9
10
11
12
13
14
15
16
17
18
19
20
21
22
23
24
window.onload = function () {
  //<editor-fold desc="Changeable Configuration Block">

  // the following lines will be replaced by docker/configurator, when it runs in a docker-container
  window.ui = SwaggerUIBundle({
    urls: [
      {
        url: "http://localhost:8081/static/swagger-ui/openapi3.yaml",
        name: "Local"
      },
      {
        url: "https://dev.example.com/static/swagger-ui/openapi3.yaml",
        name: "Dev"
      }
    ],
    dom_id: "#swagger-ui",
    deepLinking: true,
    presets: [SwaggerUIBundle.presets.apis, SwaggerUIStandalonePreset],
    plugins: [SwaggerUIBundle.plugins.DownloadUrl],
    layout: "StandaloneLayout"
  });

  //</editor-fold>
};
Swagger UI 테스트
페이지 동작 확인
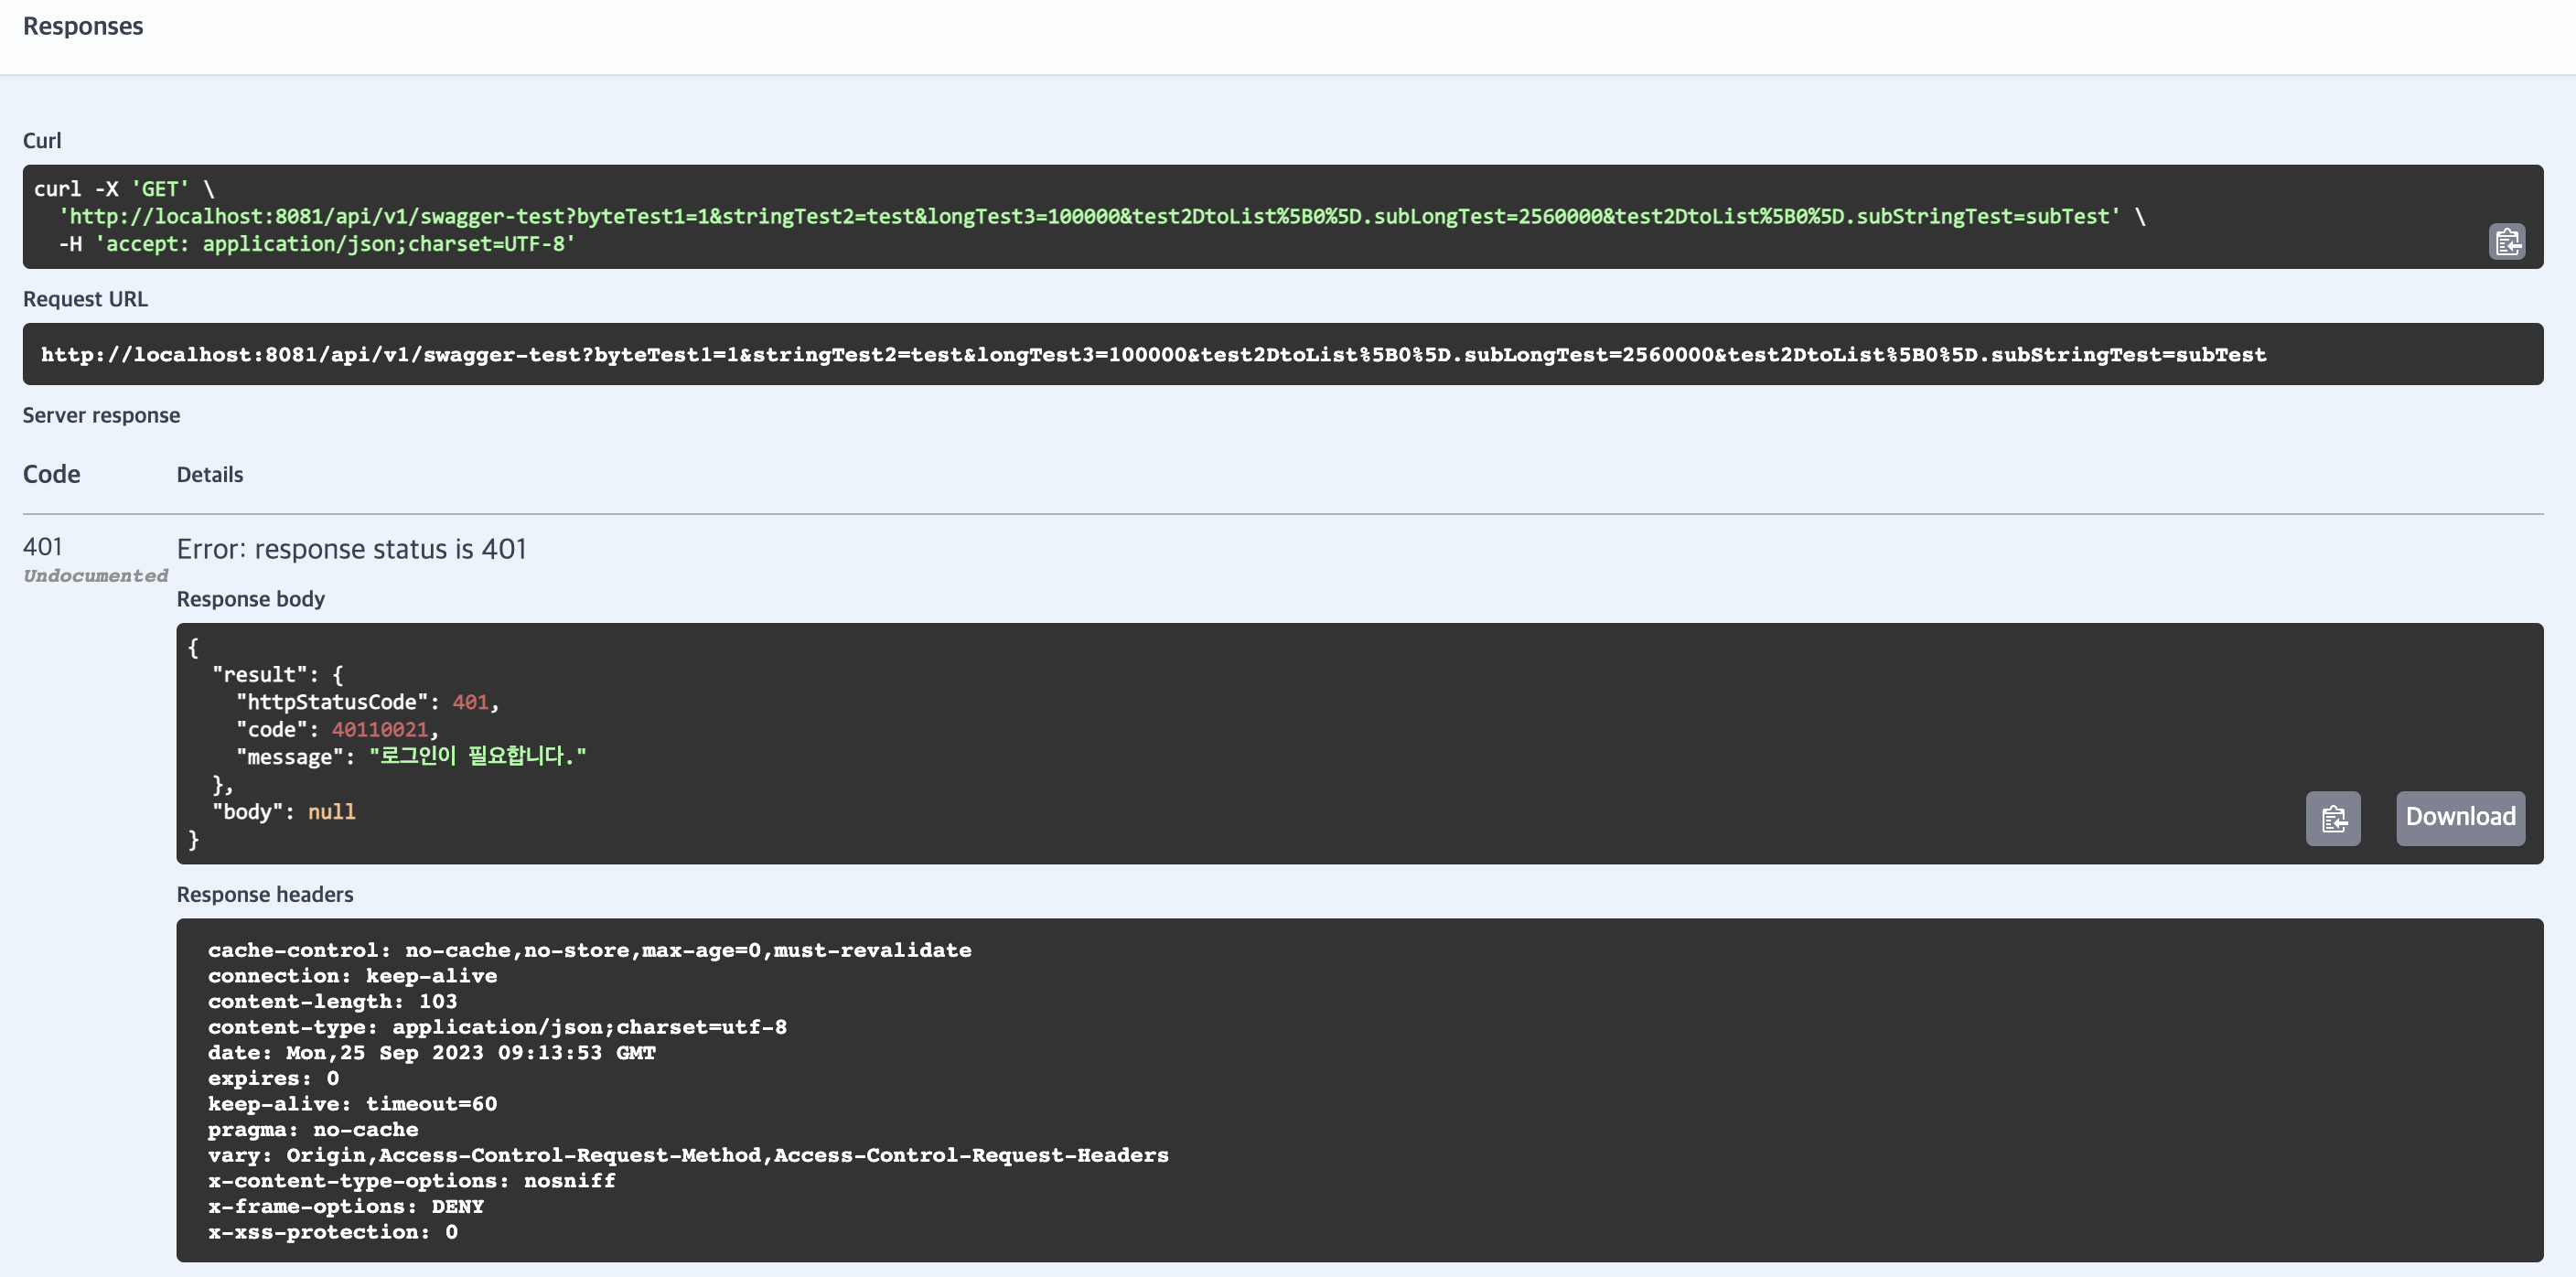
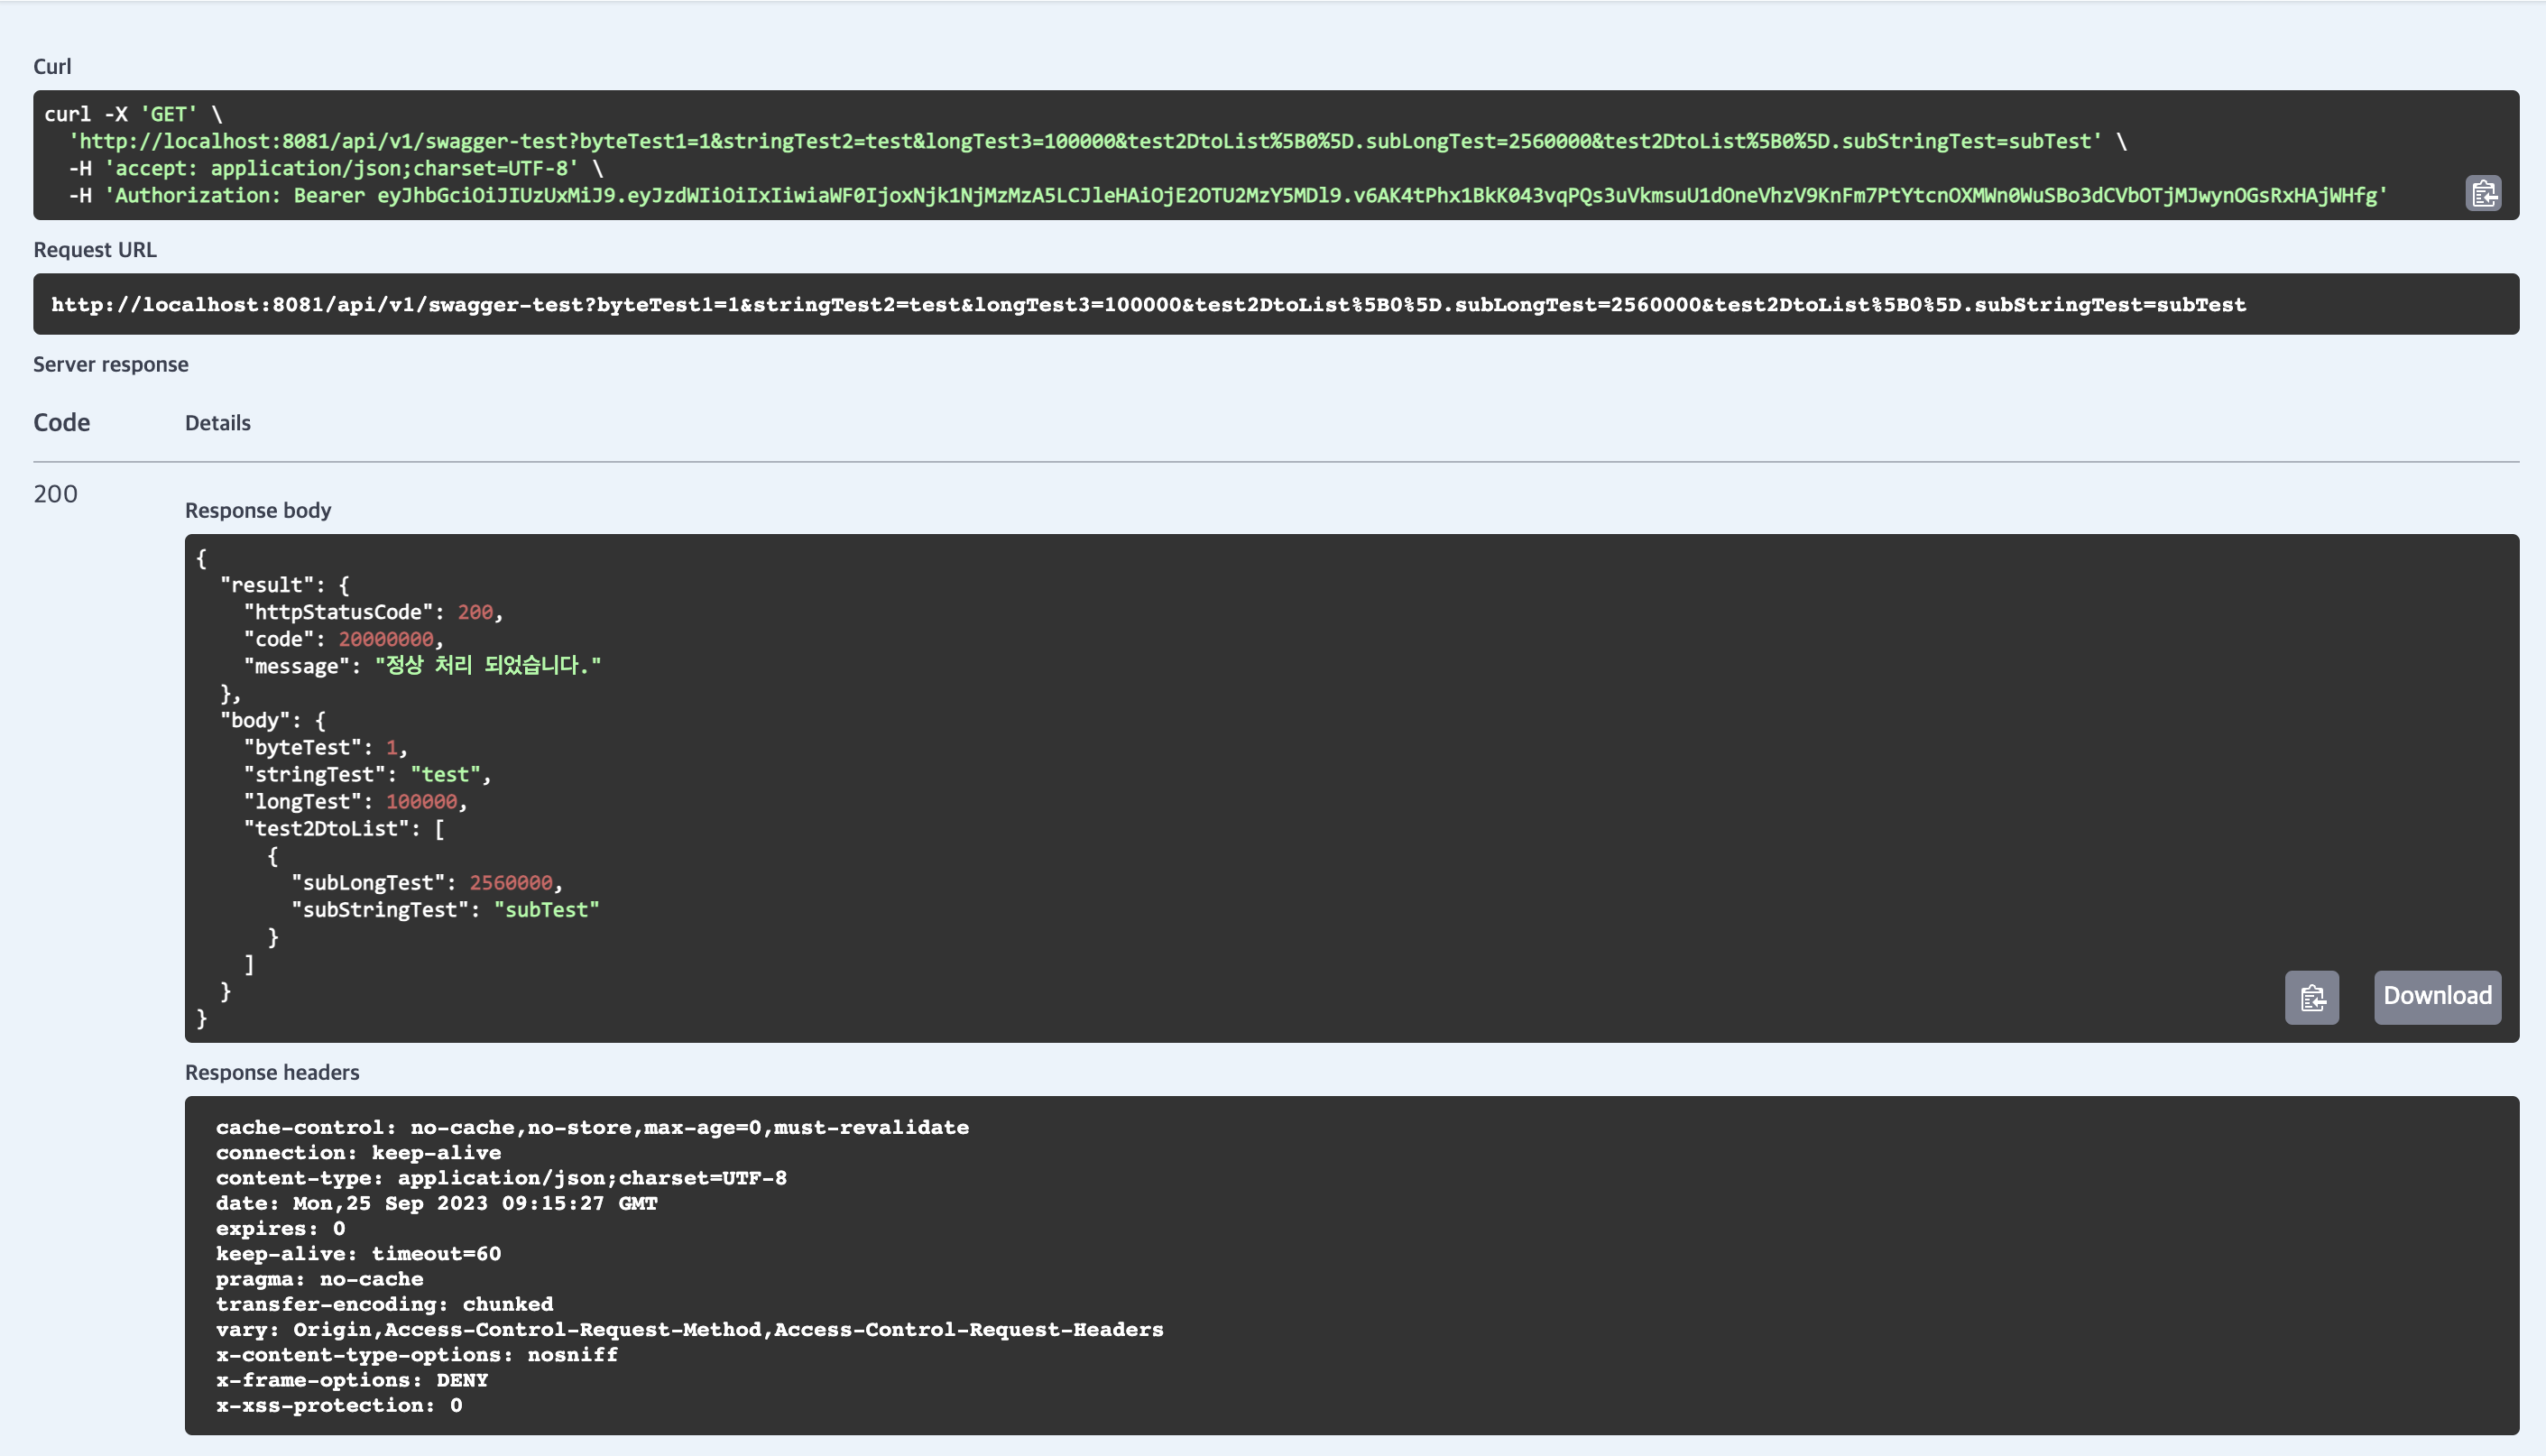
이제 모든 준비가 끝났습니다! swagger 태스크를 실행하고 로컬 서버를 실행하면 http://localhost:8081/swagger-ui.html에서 아래와 같은 아름다운 Swagger 문서 페이지가 나타날겁니다!

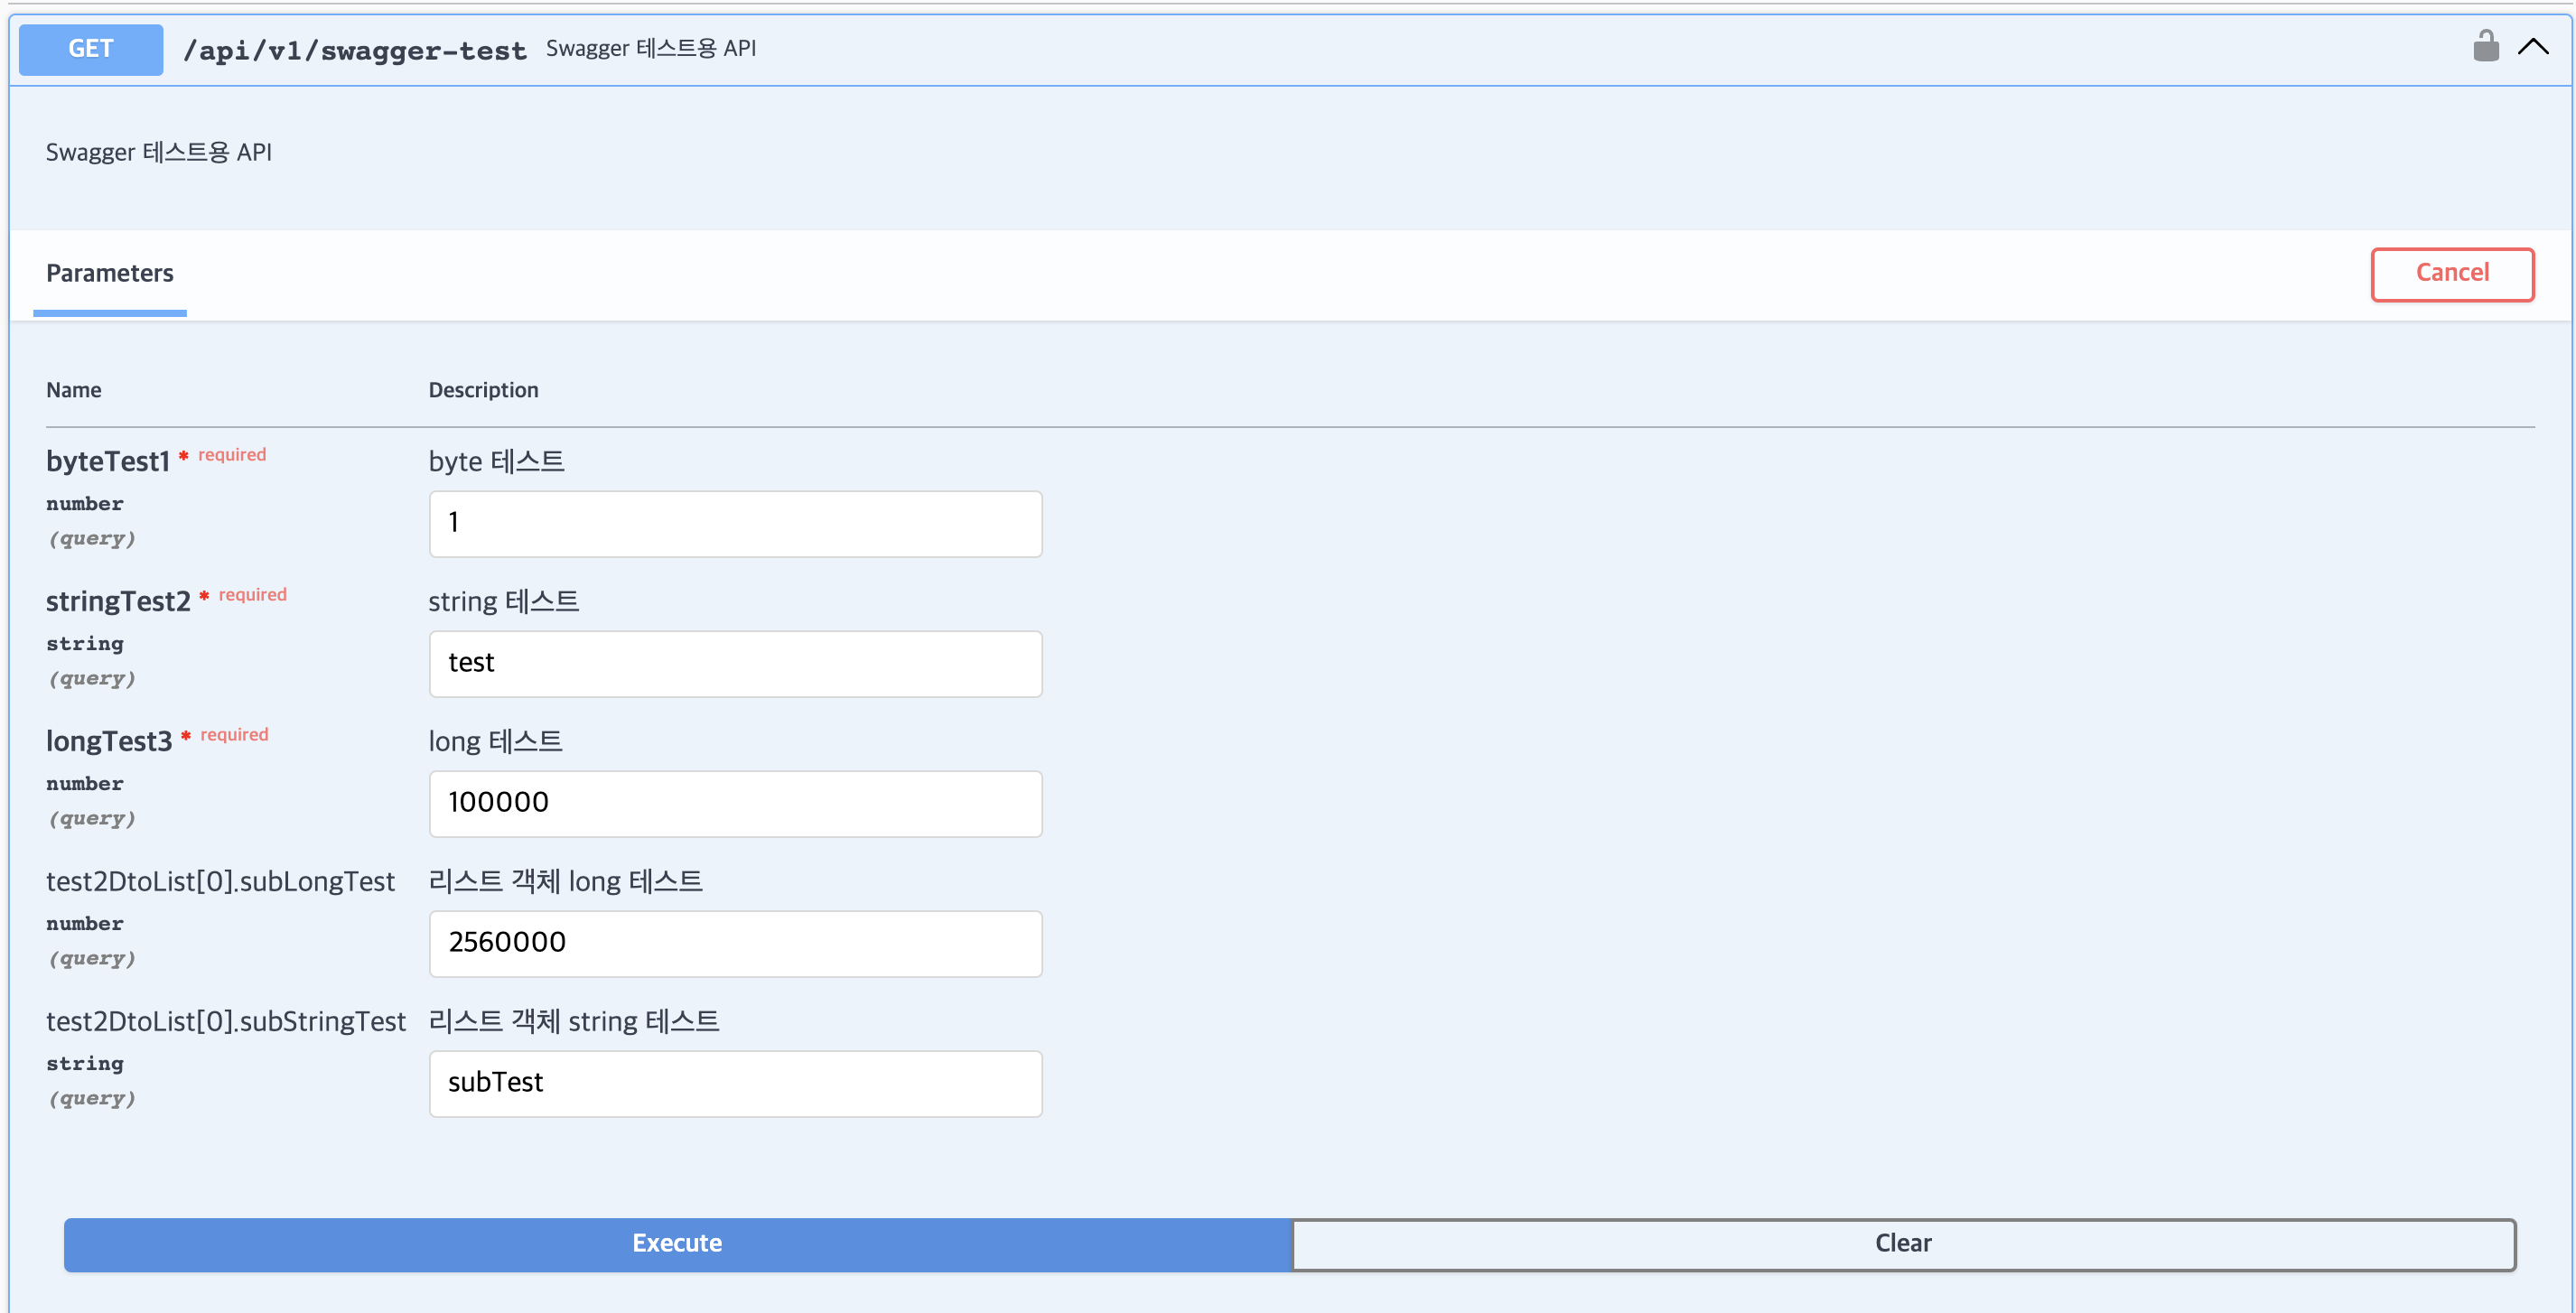
Parameters
테스트 코드에서 설정한대로 Parameters 정보를 넣을 수 있습니다.
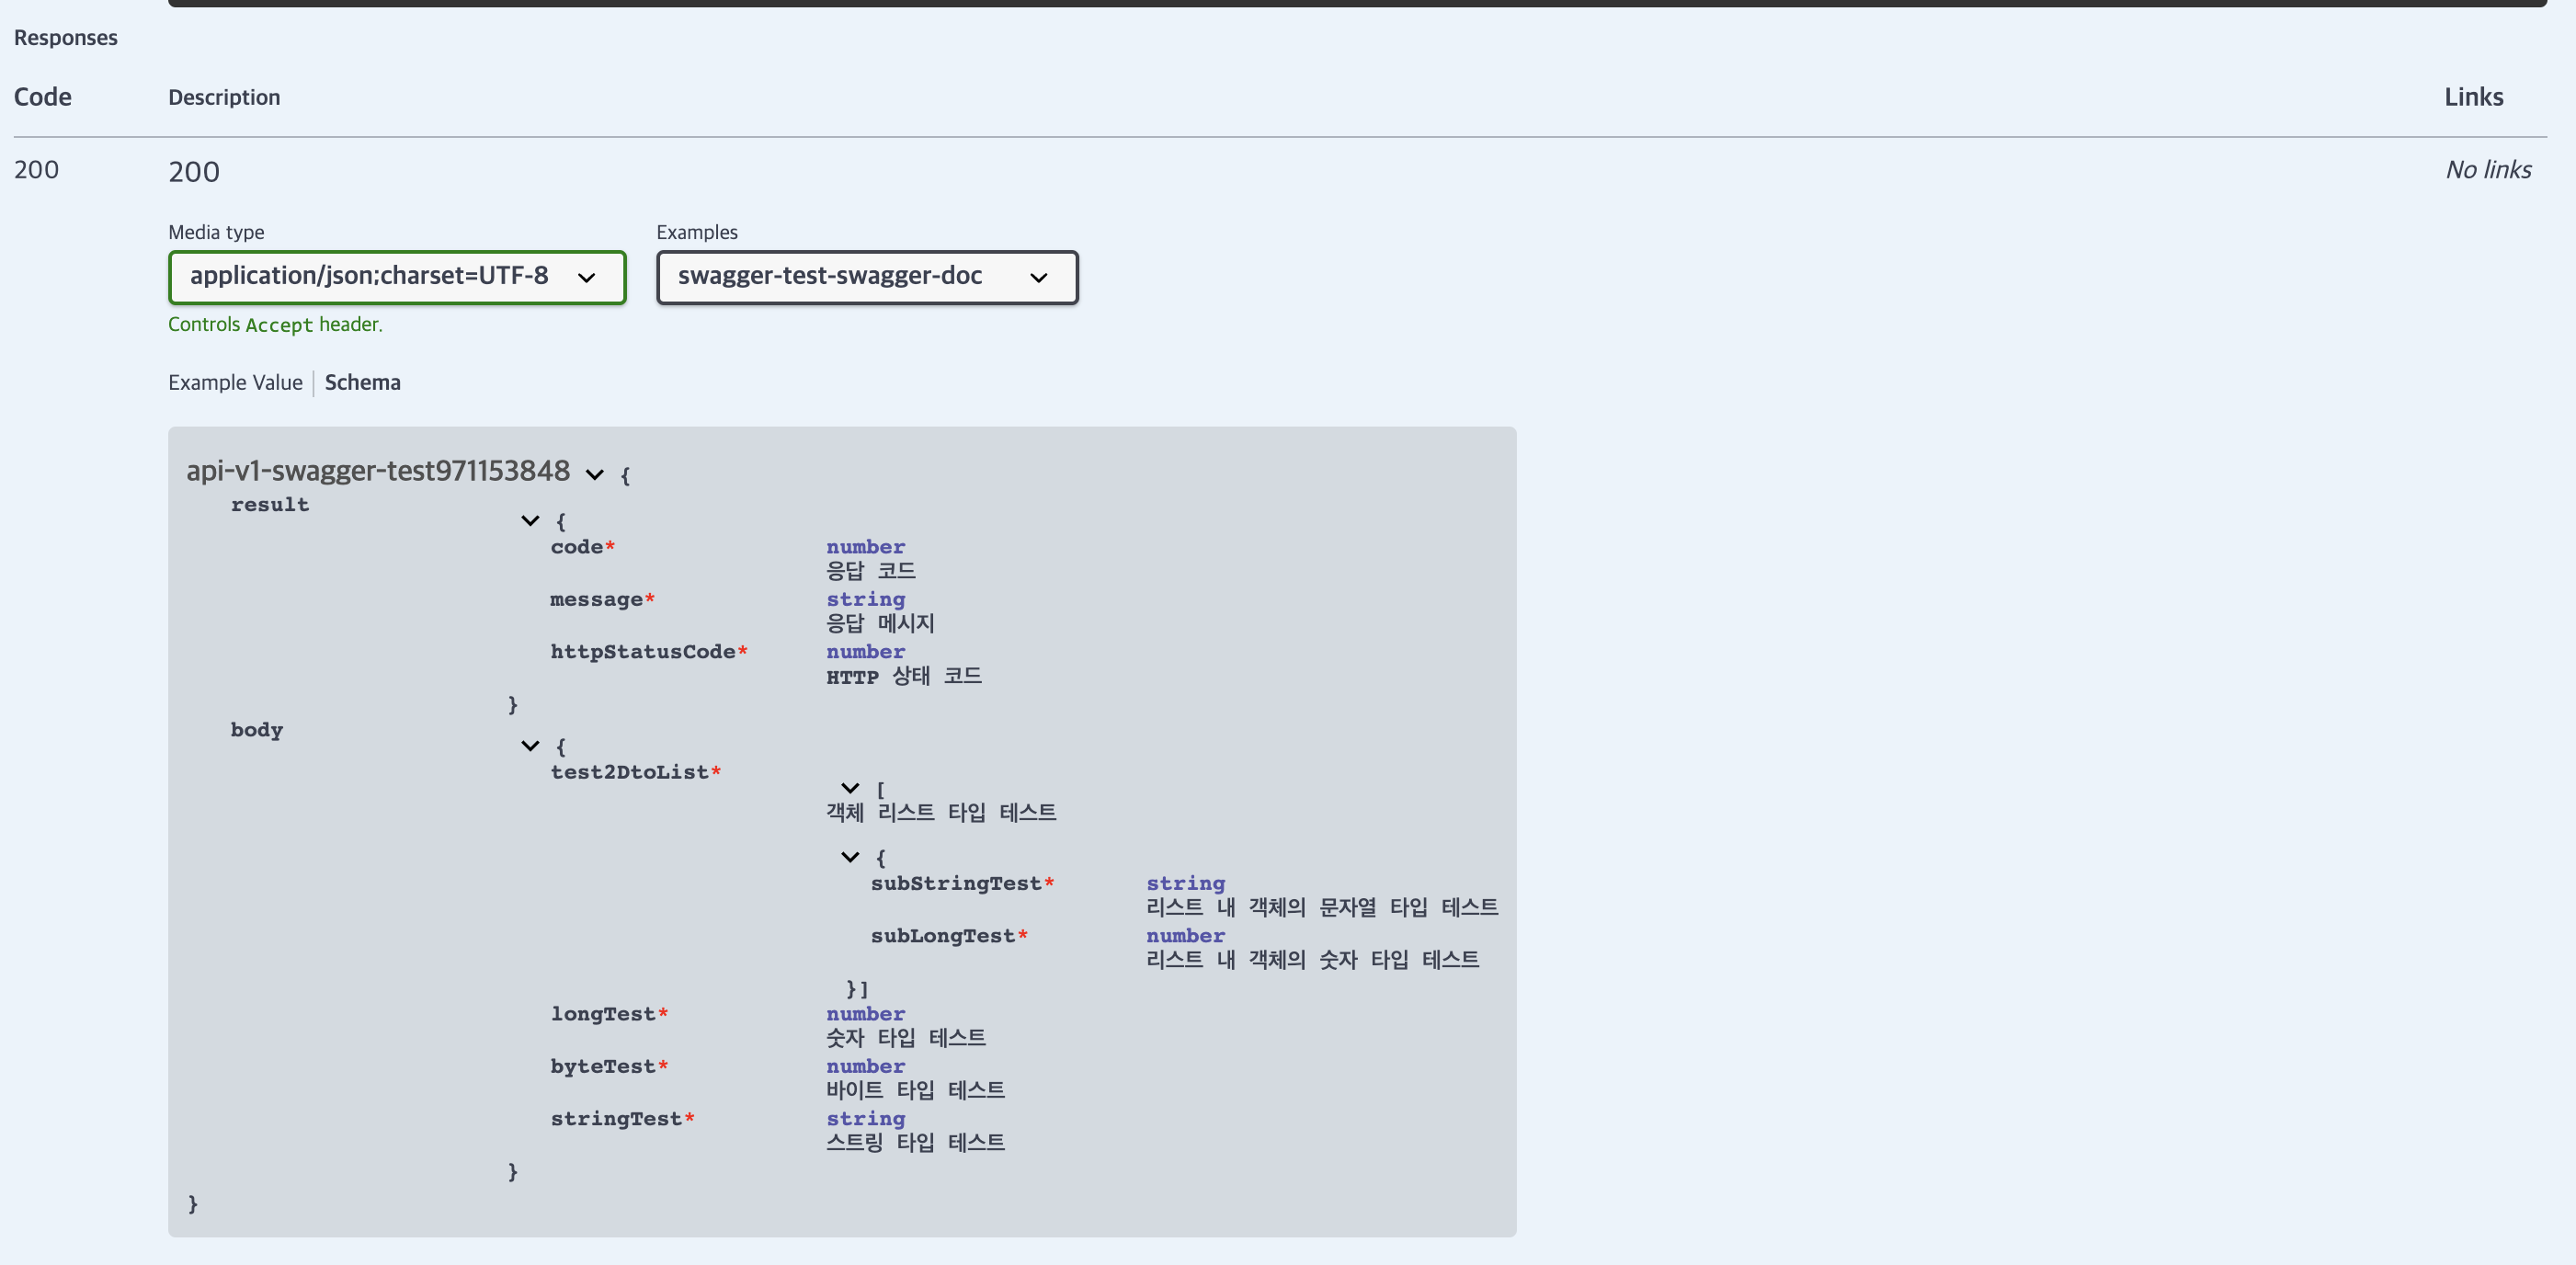
Schema
마찬가지로 fieldWithPath로 정의해준 스키마 정보도 제대로 나옵니다.
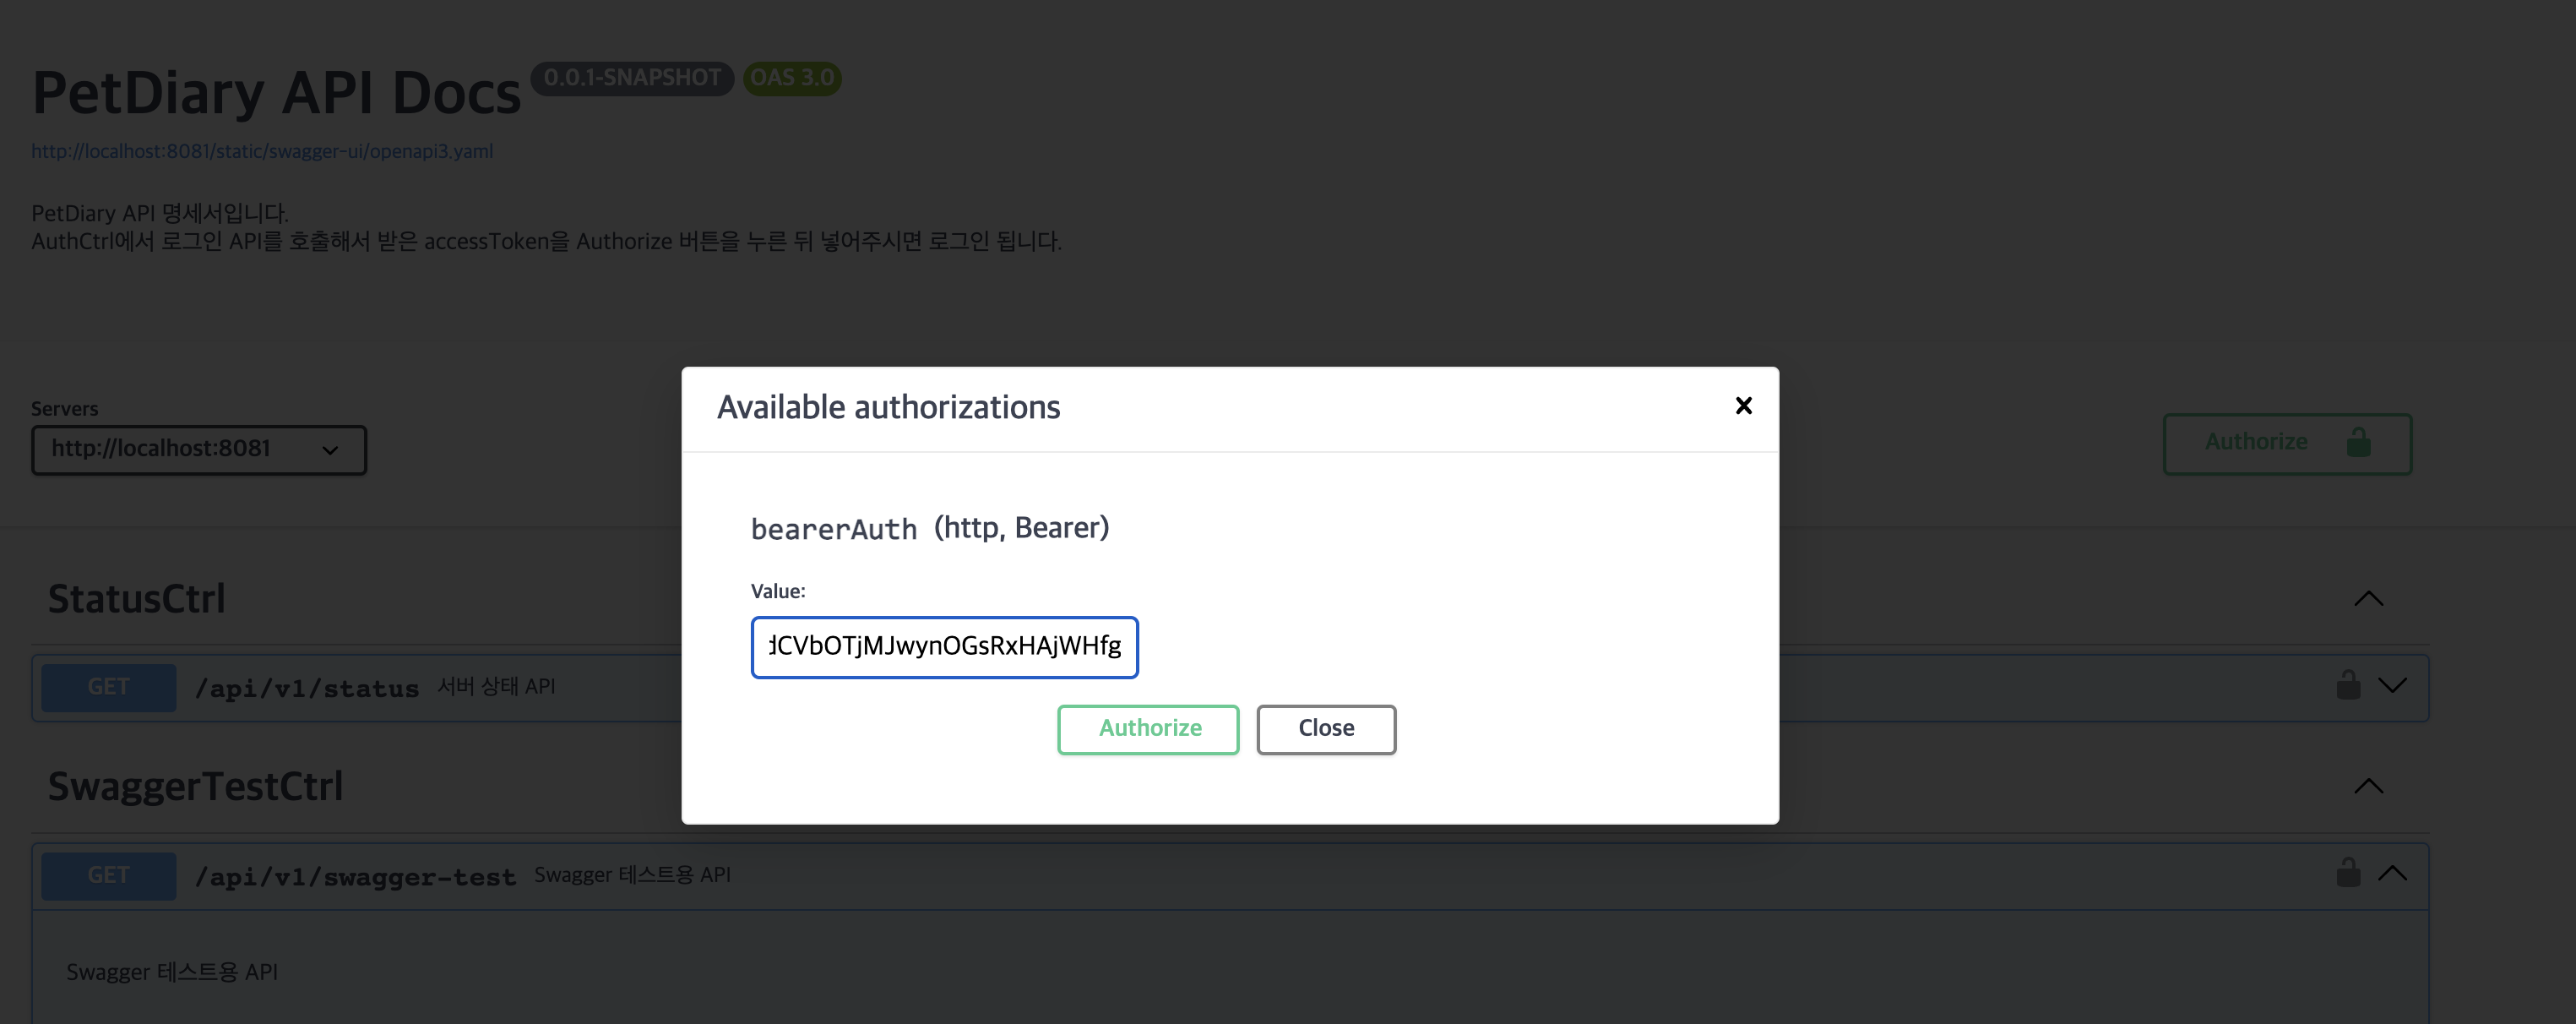
Authorize
로그인이 필요한 페이지일 경우 Authorize 버튼을 눌러 다음과 같이 토큰 값을 넣어줄 수 있습니다.
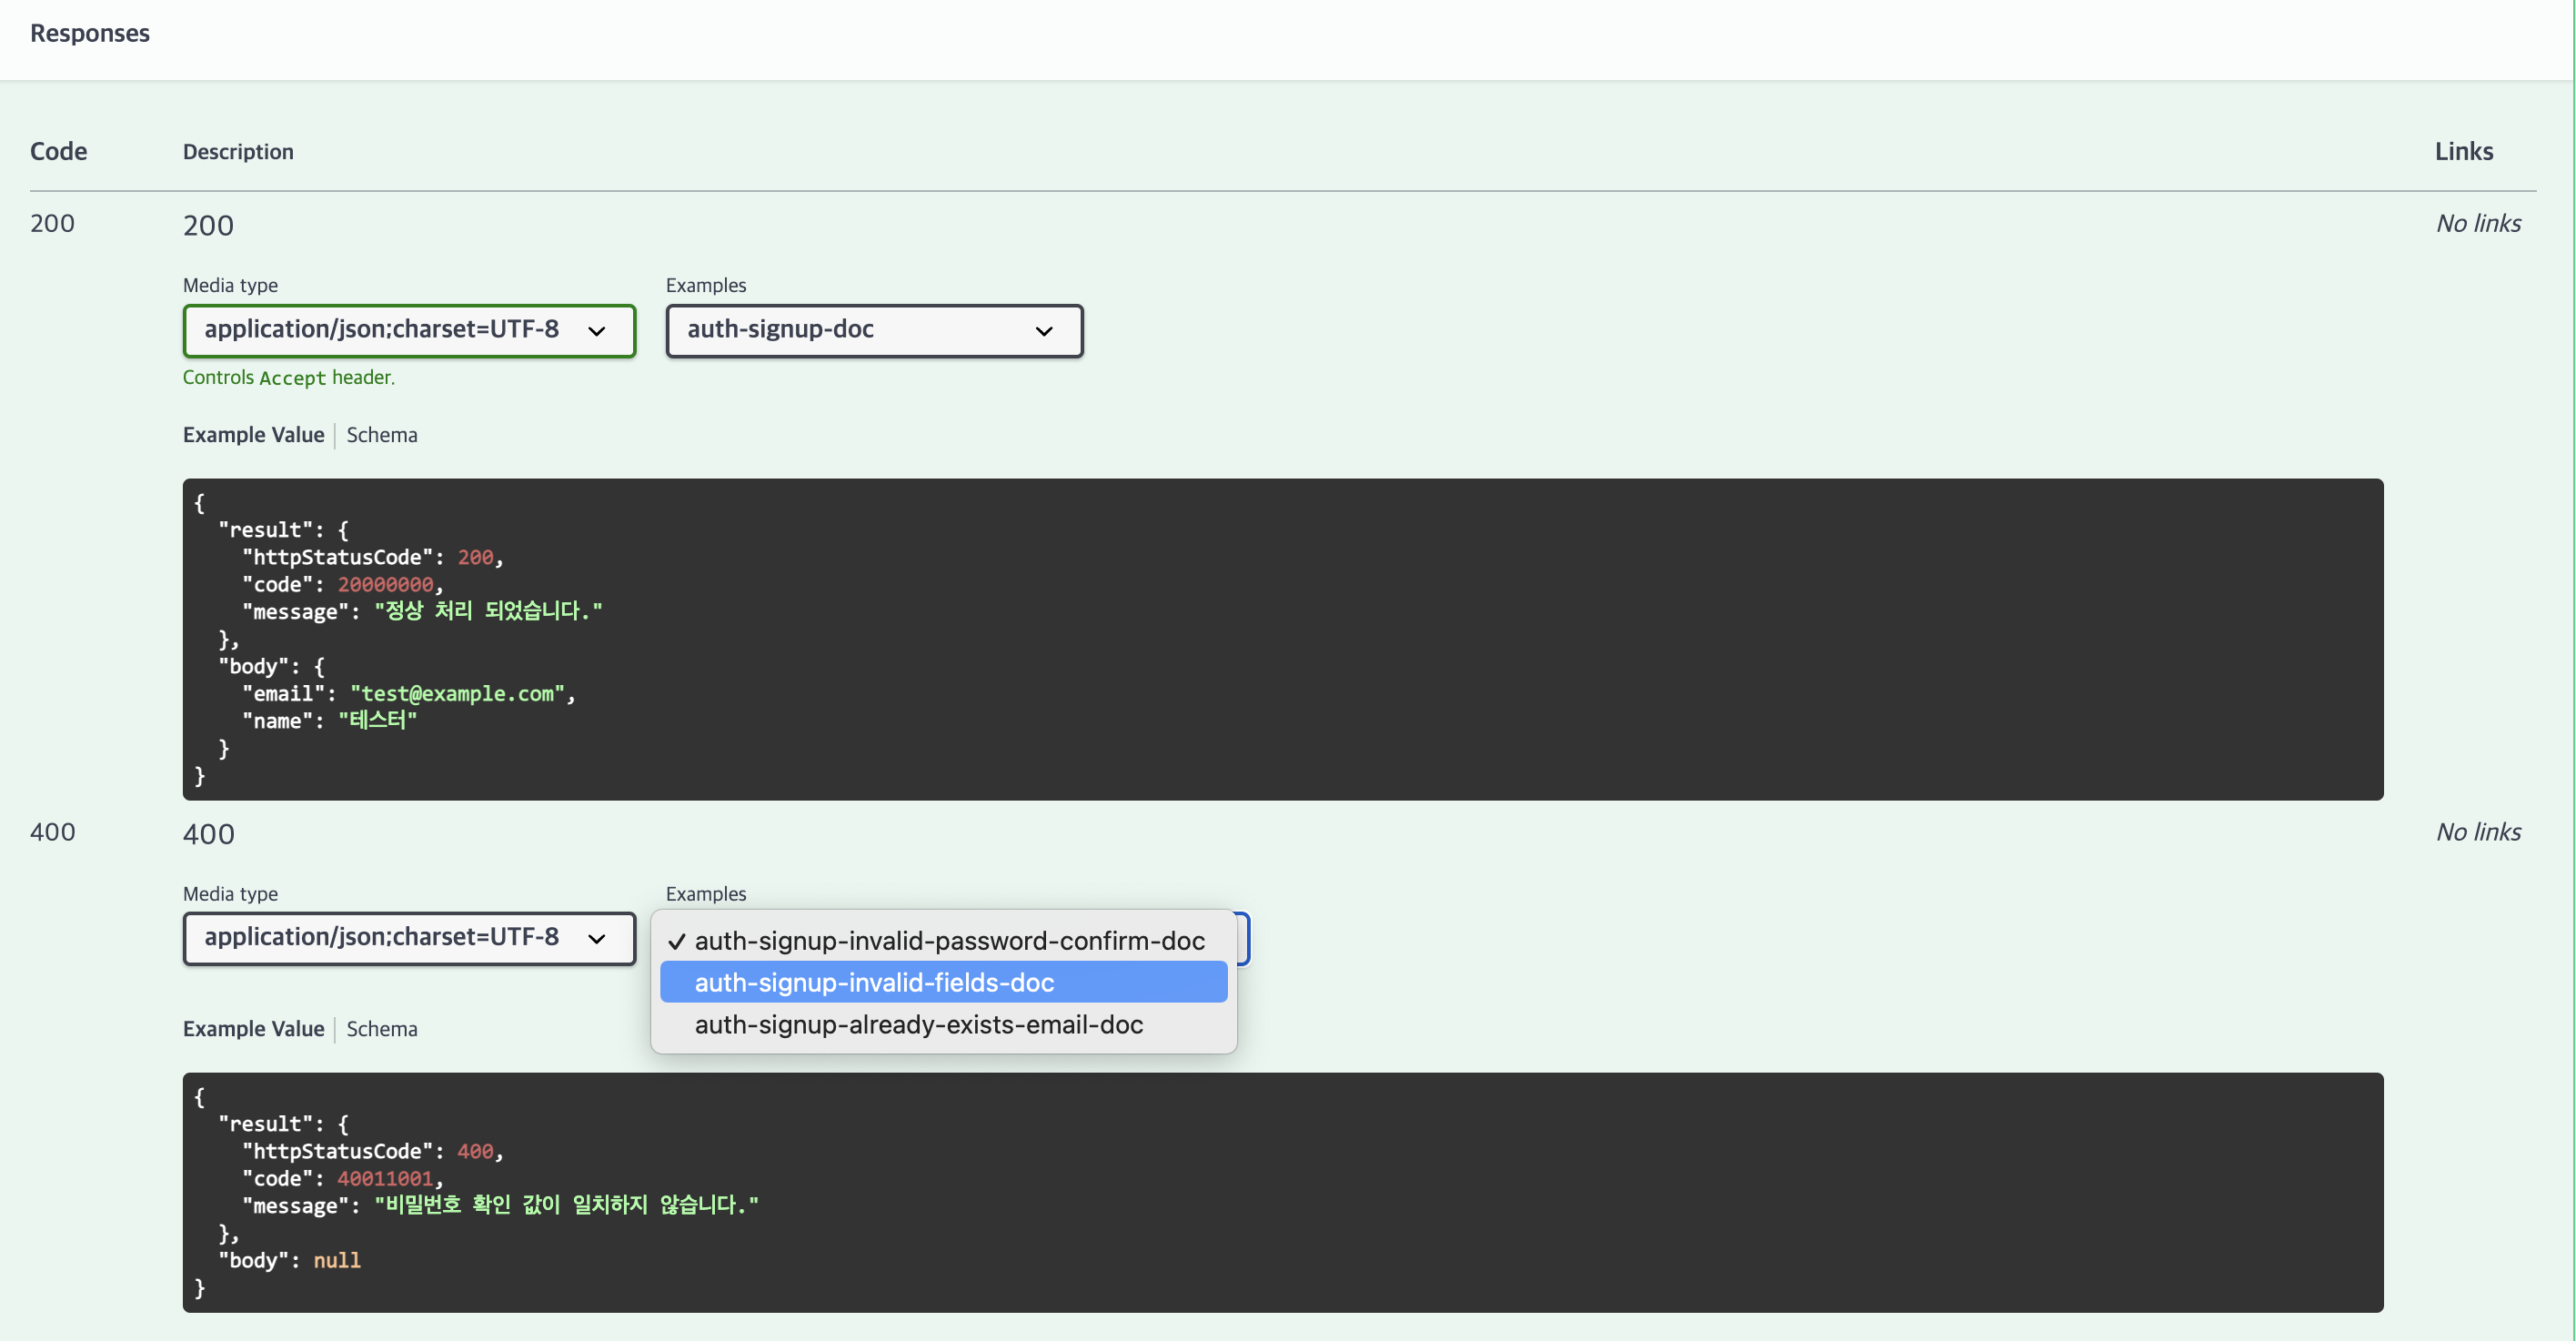
Error Case Docs
에러 케이스에 대한 테스트 코드를 작성하실 경우 아래와 같이 여러가지 에러에 대한 문서도 자동으로 생성해주어 아주 편리합니다!
1
2
3
4
5
6
7
8
9
10
11
12
13
14
15
16
17
18
19
@Test
public void testSignupAlreadyExistsEmail() throws Exception {
    AuthReq.SignupDto reqDto = AuthDtoFactory.createSignupReqDto();
    String jsonContent = getJsonContent(reqDto);

    when(authSvc.signup(any())).thenThrow(new ApiRestException(ApiResponseCode.ALREADY_EXISTS_EMAIL));

    mockMvc.perform(post("/api/v1/auth/signup")
                    .contentType(MediaType.APPLICATION_JSON)
                    .content(jsonContent))
            .andExpect(status().isBadRequest())
            .andExpect(jsonPath("$.result.code").value(ApiResponseCode.ALREADY_EXISTS_EMAIL.getCode()))
            .andDo(document(getDocumentName(), ResourceDocumentation.resource(
                    ResourceSnippetParameters.builder()
                            .tag("AuthCtrl")
                            .description("회원가입")
                            .build()
            )));
}
결론
Spring Restdocs는 테스트 코드를 기반으로하여 API 문서화를 도와주는 아주 강력한 도구입니다. 이 도구는 API의 신뢰도를 크게 향상시켜주지만, 설정이 다소 까다로울 수 있다는 점이 단점으로 여겨질 수 있습니다. 그런 분들께 이 포스트를 통해 이러한 설정 과정을 조금 더 쉽게 이해하고 진행할 수 있기를 바랍니다. 😄